> ## Documentation Index
> Fetch the complete documentation index at: https://help.csvbox.io/llms.txt
> Use this file to discover all available pages before exploring further.
# OpenAPI
> Send your CSV or Excel sheet data directly to any API described by an OpenAPI specification.
The OpenAPI destination sends each row of your users' CSV or Excel data to an endpoint of any API that publishes an OpenAPI specification. CSVbox loads the spec, lets you pick the endpoint, and maps your sheet columns to the fields it expects.
## How it works
Open your sheet, go to **Destination**, and choose **OpenAPI** from the list.
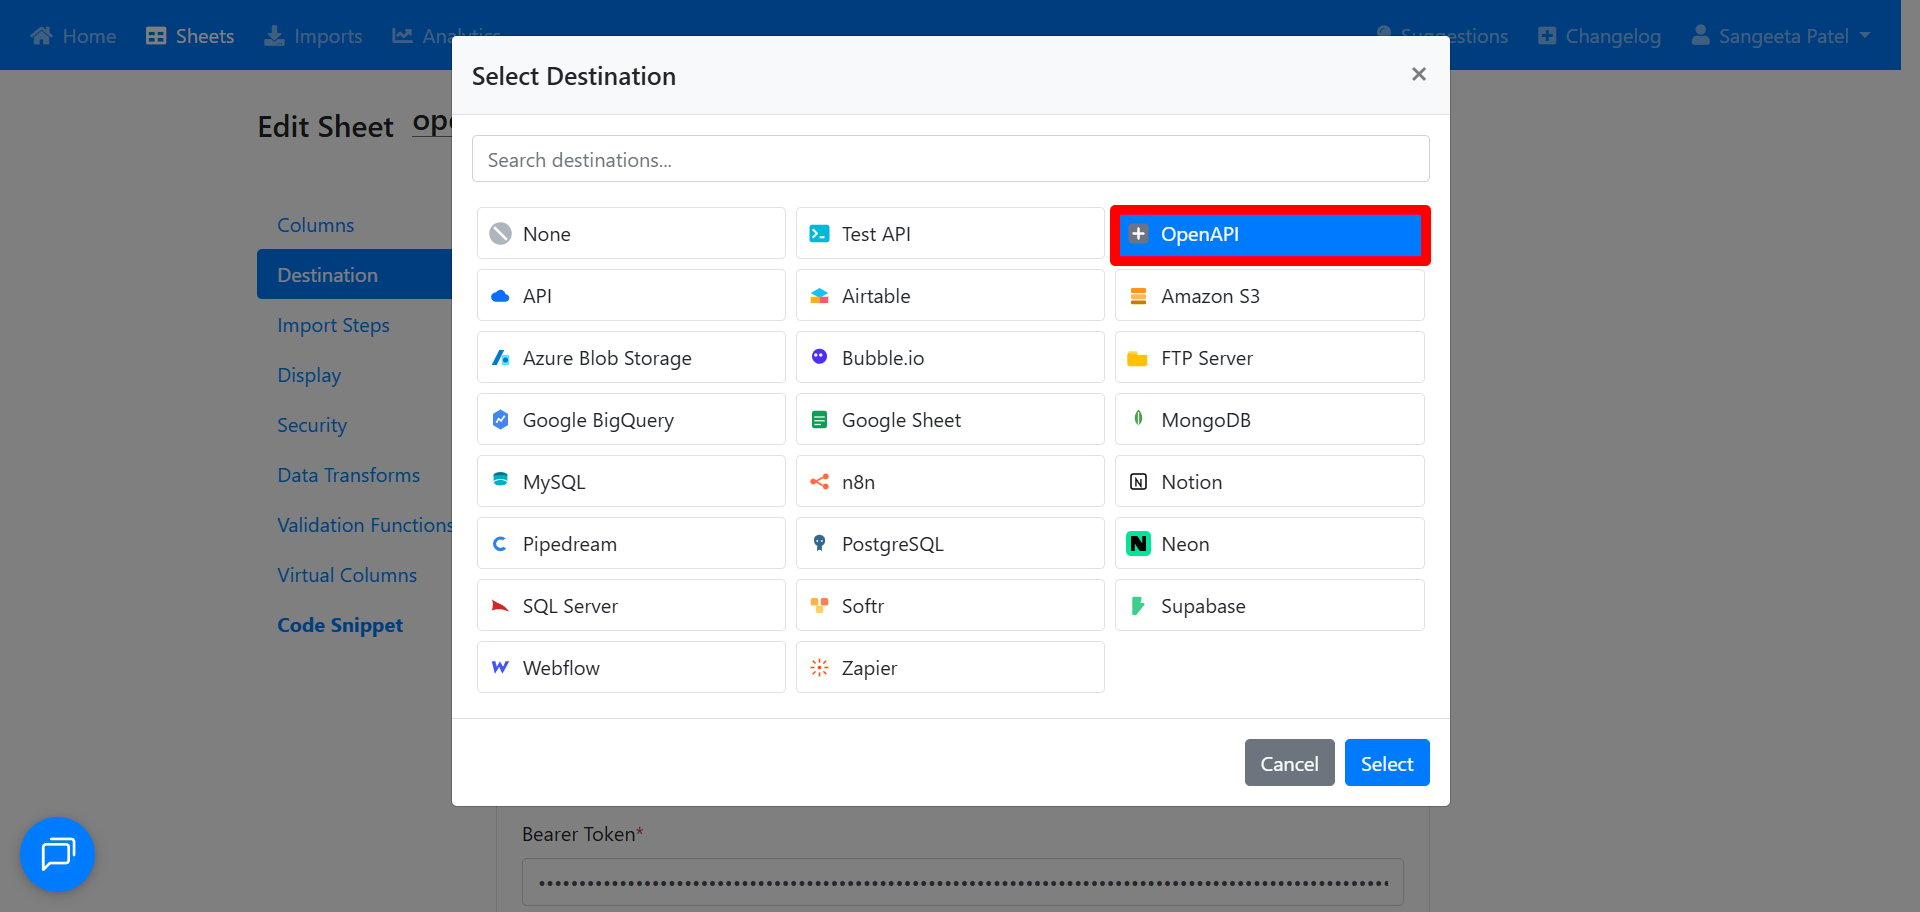 Paste the **OpenAPI Specification URL** (a link to the API's spec file) and click **Load Specification**. This pulls in the list of available endpoints.
Pick the endpoint you want to send data to, for example `POST /v1/prices - Create Tiered Price`.
Choose the method for the request, such as **POST** to create new records.
Select how the API verifies you (for example, **Bearer Token**) and enter your credentials in the field that appears, such as your **Bearer Token**.
Click **Test Connection**. A green checkmark means your settings are correct.
Match each column in your sheet to the matching field expected by the API. You can also map custom attributes.
Paste the **OpenAPI Specification URL** (a link to the API's spec file) and click **Load Specification**. This pulls in the list of available endpoints.
Pick the endpoint you want to send data to, for example `POST /v1/prices - Create Tiered Price`.
Choose the method for the request, such as **POST** to create new records.
Select how the API verifies you (for example, **Bearer Token**) and enter your credentials in the field that appears, such as your **Bearer Token**.
Click **Test Connection**. A green checkmark means your settings are correct.
Match each column in your sheet to the matching field expected by the API. You can also map custom attributes.
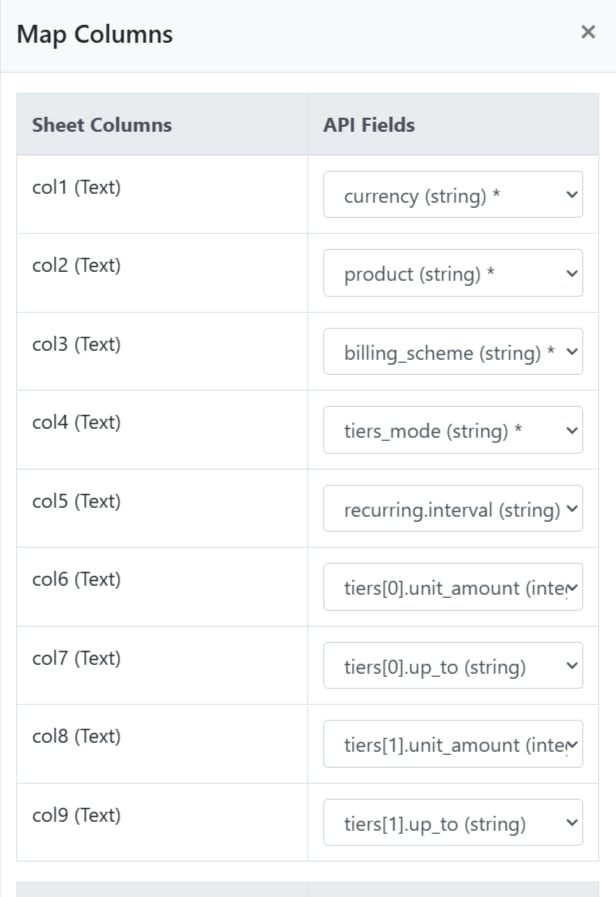 Once set up, your sheet data is sent to the API endpoint, one request per row.
## Example
This example shows how to test the OpenAPI destination end to end, for free, using a temporary inbox. You send sheet data to a test URL and watch it arrive live. Once it works, you swap in a real API.
### What you'll use
* **webhook.site**: a free service that gives you a temporary URL and shows every request it receives. It stands in for a real API so you can see your data arriving.
* **GitHub Gist**: a free place to host your OpenAPI spec file so the destination can load it from a URL.
### Walkthrough
Go to **webhook.site**. It instantly shows a unique URL at the top, like:
```text theme={null}
https://webhook.site/abc-123
```
Leave this tab open. Every request you send appears here in real time.
Go to **gist.github.com** and create a new gist. Paste in the spec below, replacing the `servers` URL with **your** webhook.site URL from the previous step.
```json theme={null}
{
"openapi": "3.0.0",
"info": { "title": "Test API", "version": "1.0" },
"servers": [{ "url": "YOUR WEBHOOK URL" }],
"paths": {
"/": {
"post": {
"summary": "Send Row",
"requestBody": {
"content": {
"application/json": {
"schema": {
"type": "object",
"properties": {
"name": { "type": "string" },
"email": { "type": "string" }
}
}
}
}
},
"responses": {
"200": { "description": "OK" }
}
}
}
}
}
```
In your sheet, go to **Destination** and set it up:
| Field | Value |
| - | - |
| Send Data To | **OpenAPI** |
| OpenAPI Specification URL | Your **Raw** gist URL → click **Load Specification** |
| Select Endpoint | `POST / - Send Row` |
| HTTP Method | `POST` |
| Authentication Type | **None** |
Then click **Test Connection**.
Why **None**? webhook.site accepts anything, so there's no token to provide. Leaving authentication on **Bearer Token** with an empty token is the most common reason the test fails.
Match each column in your sheet to a field in the API:
| Sheet column | API field |
| - | - |
| Name | name |
| Email | email |
Upload a small CSV with a couple of rows. As the import runs, switch to your webhook.site tab. Each row appears as its own incoming POST request, with the data inside it.
That confirms the whole loop is working.
This documentation is built and hosted on [Mintlify](https://mintlify.com), a developer documentation platform.
Once set up, your sheet data is sent to the API endpoint, one request per row.
## Example
This example shows how to test the OpenAPI destination end to end, for free, using a temporary inbox. You send sheet data to a test URL and watch it arrive live. Once it works, you swap in a real API.
### What you'll use
* **webhook.site**: a free service that gives you a temporary URL and shows every request it receives. It stands in for a real API so you can see your data arriving.
* **GitHub Gist**: a free place to host your OpenAPI spec file so the destination can load it from a URL.
### Walkthrough
Go to **webhook.site**. It instantly shows a unique URL at the top, like:
```text theme={null}
https://webhook.site/abc-123
```
Leave this tab open. Every request you send appears here in real time.
Go to **gist.github.com** and create a new gist. Paste in the spec below, replacing the `servers` URL with **your** webhook.site URL from the previous step.
```json theme={null}
{
"openapi": "3.0.0",
"info": { "title": "Test API", "version": "1.0" },
"servers": [{ "url": "YOUR WEBHOOK URL" }],
"paths": {
"/": {
"post": {
"summary": "Send Row",
"requestBody": {
"content": {
"application/json": {
"schema": {
"type": "object",
"properties": {
"name": { "type": "string" },
"email": { "type": "string" }
}
}
}
}
},
"responses": {
"200": { "description": "OK" }
}
}
}
}
}
```
In your sheet, go to **Destination** and set it up:
| Field | Value |
| - | - |
| Send Data To | **OpenAPI** |
| OpenAPI Specification URL | Your **Raw** gist URL → click **Load Specification** |
| Select Endpoint | `POST / - Send Row` |
| HTTP Method | `POST` |
| Authentication Type | **None** |
Then click **Test Connection**.
Why **None**? webhook.site accepts anything, so there's no token to provide. Leaving authentication on **Bearer Token** with an empty token is the most common reason the test fails.
Match each column in your sheet to a field in the API:
| Sheet column | API field |
| - | - |
| Name | name |
| Email | email |
Upload a small CSV with a couple of rows. As the import runs, switch to your webhook.site tab. Each row appears as its own incoming POST request, with the data inside it.
That confirms the whole loop is working.
This documentation is built and hosted on [Mintlify](https://mintlify.com), a developer documentation platform.