> ## Documentation Index
> Fetch the complete documentation index at: https://help.csvbox.io/llms.txt
> Use this file to discover all available pages before exploring further.
# Verify Data
> Settings for the data review step: row display, search, export, date correction, AI bulk edits, validation limits, and invalid data handling.
Verify Data is the fourth tab under **Sheet Settings** → **Import Steps**. On this step, users review their data, fix validation errors, and submit. Validation rules you set on [Columns](/sheet-settings/columns) are checked here.
## Skip this step
Skip the Verify Data screen. You can choose to always skip it, or to skip it only if no validation errors are found.
## Help text
Add help text to the Verify Data page, separately for each language. The help text supports Markdown formatting for bold, italics, and links.
## Default value for row selection
Choose which rows the table shows by default: **All** rows or **Invalid** rows only.
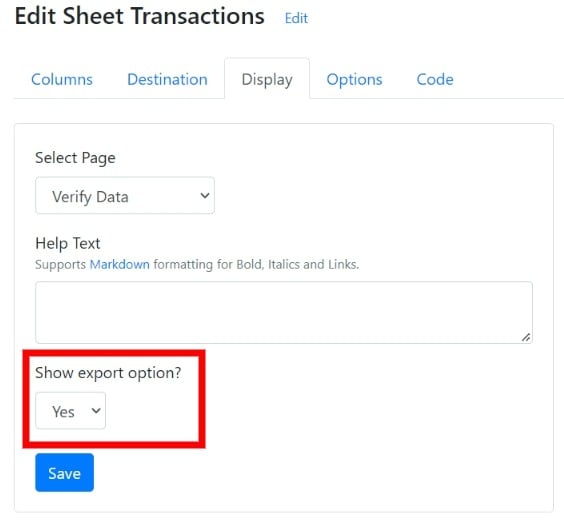
## Show export option
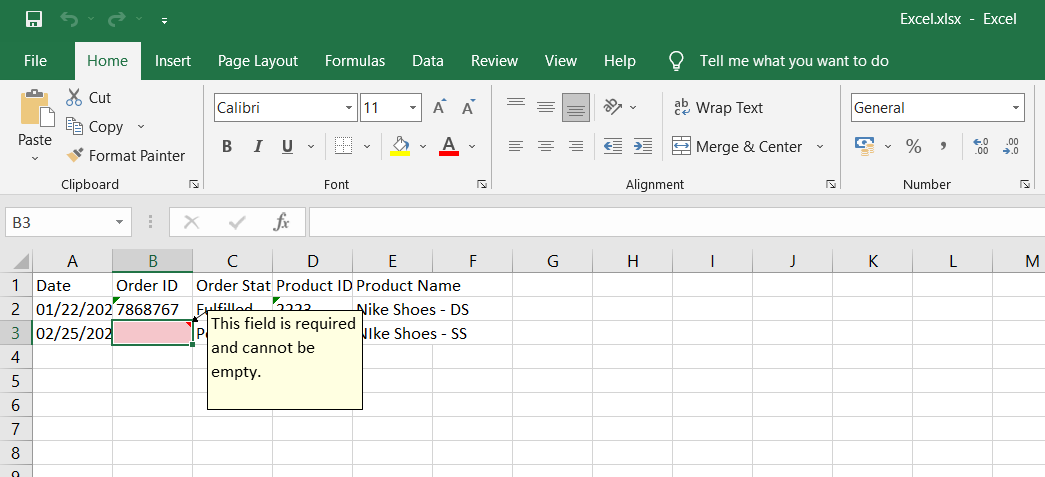
Export validation errors in Excel.
Enable or disable the **Export** button on the Verify Data screen. Your users can export data to Excel while keeping the error highlighting and error messages. This helps them resolve the errors in the Excel sheet and quickly re-upload the file in CSVbox.
 ## Show search option
Show or hide the search box that lets users quickly find text in the uploaded sheet.
## Enable AI transformations
Let users apply AI-driven changes to their data with natural language prompts, directly in the importer. See [AI Bulk Transforms](/dashboard-settings/ai-bulk-transforms).
## Allow adding of new rows
Allow or restrict adding new rows on the Verify Data screen.
## Default number of rows to display
Set the default number of rows displayed on the Verify Data screen: 10, 25, 50, or 100.
## Allow invalid data
Let users submit data that has validation errors. See the [`allow_invalid`](/getting-started/2-install-code#allow_invalid) option.
## Date correction
Convert dates and numbers written in different regional formats into the format your column expects, and ask the user once when a value such as `04/05/2024` or `1,234` could be read two ways. Users confirm unclear dates and numbers before they reach the Verify Data screen. See [Smart Date and Number Formats](/dashboard-settings/smart-date-and-number-formats).
## Max rows
Limit the number of rows that a single file can import. Leave it blank to remove the restriction.
### Allow file upload when max rows crossed
Choose whether users can still submit when the file has more rows than the limit. See [`max_rows`](/getting-started/2-install-code#max_rows) for the related options.
### Custom validation message
Show your own message when the max rows limit is crossed.
## Min rows
Require a minimum number of rows in a single file. Leave it blank to remove the restriction. See [`min_rows`](/getting-started/2-install-code#min_rows).
## Related
* [Data Transforms](/sheet-settings/data-transforms) reshape the data before it's validated or pushed.
* [Validation Functions](/sheet-settings/validation-functions) add custom row and column checks.
* [Allow invalid](/getting-started/2-install-code#allow_invalid) lets users submit a file even when it has validation errors.
This documentation is built and hosted on [Mintlify](https://mintlify.com), a developer documentation platform.
## Show search option
Show or hide the search box that lets users quickly find text in the uploaded sheet.
## Enable AI transformations
Let users apply AI-driven changes to their data with natural language prompts, directly in the importer. See [AI Bulk Transforms](/dashboard-settings/ai-bulk-transforms).
## Allow adding of new rows
Allow or restrict adding new rows on the Verify Data screen.
## Default number of rows to display
Set the default number of rows displayed on the Verify Data screen: 10, 25, 50, or 100.
## Allow invalid data
Let users submit data that has validation errors. See the [`allow_invalid`](/getting-started/2-install-code#allow_invalid) option.
## Date correction
Convert dates and numbers written in different regional formats into the format your column expects, and ask the user once when a value such as `04/05/2024` or `1,234` could be read two ways. Users confirm unclear dates and numbers before they reach the Verify Data screen. See [Smart Date and Number Formats](/dashboard-settings/smart-date-and-number-formats).
## Max rows
Limit the number of rows that a single file can import. Leave it blank to remove the restriction.
### Allow file upload when max rows crossed
Choose whether users can still submit when the file has more rows than the limit. See [`max_rows`](/getting-started/2-install-code#max_rows) for the related options.
### Custom validation message
Show your own message when the max rows limit is crossed.
## Min rows
Require a minimum number of rows in a single file. Leave it blank to remove the restriction. See [`min_rows`](/getting-started/2-install-code#min_rows).
## Related
* [Data Transforms](/sheet-settings/data-transforms) reshape the data before it's validated or pushed.
* [Validation Functions](/sheet-settings/validation-functions) add custom row and column checks.
* [Allow invalid](/getting-started/2-install-code#allow_invalid) lets users submit a file even when it has validation errors.
This documentation is built and hosted on [Mintlify](https://mintlify.com), a developer documentation platform.